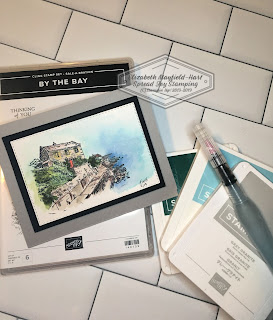
Watercolor By The Bay
Bye The Sea, By The Beautiful Sea
The "By The Bay" Stamp Set makes me think of that song that goes, "By the sea, by the sea, by the beautiful sea." And the scene looks to me like something you would see people sitting outside near a bay painting "Plein Air"; I don't know why it evokes such fanciful thoughts in me, but I knew that I was going to have to do something special with it!
 |
| I watercolored the image using an Aquapainter and Stampin' Up! ink. |
I stamped the large image from the set on Shimmery White Cardstock using Staz-On ink because I decided that I needed to watercolor this image.
For the rock walls I used Gray Granite as the base color and after that dried, I added accents and dimension with Early Espresso. I also used these same colors on the rocks in the water and on the large house.
 |
| You can see more detail in this zoomed-in image. |
I painted the ocean and the sky first with Balmy Blue and then with Blueberry Bushel. I really used a lot of water on these as I moved away from the rocks because I wanted the ocean to blend with the sky; I carried the colors up and over the large house with an even lighter wash.
I added a few final touches to the roofs of both houses and the windows before adding the final bit of color, the red front door!
I cut out the watercolor painting using a stitched rectangle and then mounted it on a black cardstock rectangle cut using the next larger stitched rectangle and then finally mounting them both onto a
4 1/4" X 5 1/2" piece of Gray Granite cardstock. This gives the painting a framed look.
I hated to just mail this card and then leave the recipient wondering what to do with it; "do I just hang onto this card, do I try to make it stand up somewhere, do I (heaven forbid) throw it away?" To make the decision easy for them I turned the painting into an easel card! This way they can easily set on their desk, on an end table, or any other place of honor in their house LOL!
Here's how to make an easel card; I scored a piece of 4 1/4" X 11" piece of Gray Granite Cardstock in the center and then scored at 2 1/8" from one end. I folded the 2 1/8" piece in toward the center and unfolded it and then I folded the card in half, like you normally would to make a card base. I mounted 2 - 4" X 1 7/8" Whisper White Cardstock pieces on the inside of the card behind the top portion of the card that is scored at 2 1/8" (this gives the top of the card a little more heft which will help it last over time since it has to support the painting portion of the card). Now, folded the card in half like a normal card; the two small white rectangles should be on the inside TOP part of the card. You will attach your card front (in my case the By The Bay scene) onto the front bottom half ONLY!
 |
| Here is the easel in action! |
When you fold the card at the halfway fold (2 1/8") the painting "stands up". All you need now is something on the bottom half of the card to act as a "catch" so the front doesn't slide back down and you'll have a stand-alone easel card!
As you see in the above picture, I used a sentiment mounted on Black Cardstock to make the catch for my easel. I stamped the sentiment from "By the Bay" that says "May all of your paths lead to happiness".
 |
| Here is the easel card in acton. |
When the card is closed you can't see the sentiment at all. Hopefully when you open the card it will be obvious that the card stands up! I'm not entirely sure how to provide instructions on this! Now this has me thinking...I could print out a cute saying on Whisper White and attach it inside the card, I need a cute poem or something (what rhymes with easel?)
I really enjoyed painting this picture. I have to find more quiet time to myself to do some more watercoloring! It is so much fun!
I have discovered that with watercoloring, no matter what you make, people think that you did it right, because that's just the nature of watercolor paintings! So, don't be afraid to give it a try. Give this ink pads a good hard squish and dig out your aqua painters! If you don't have aqua painters, then grab a small paint brush and a cup of water, it works the same way! Dive in and give it a go! Post your paintings on the Spread Joy Stampers Facebook Page.
If you are ready to attempt your first watercolor painting and need help with supplies or you aren't even sure how to start, leave me a comment or shoot me an email and I can start you down the road to success!
Joyful Painting,
Elizabeth


Comments
Post a Comment